An E-Ink Display - Icons And Basic Graphics

We have previously shown how to display text on our E-Ink display, but to enhance the user experience, it’s crucial to be able to create basic icons and graphics.
ESPHome provides detailed documentation on this topic. As an example, here’s a simple code snippet from my lambda:
//
// center vertical line
//
it.line(max_x/2,row_indent, max_x/2, max_y-row_indent);
max_x and max_y are the max dimensions of my screen.
Icons are slightly more complex, but libraries like Material Design make life easier.
To use a Material Design icon on your display, you first have to import it as a font. To save memory, you will want to only import the glyphs that you are going to use. So for me the set of icons I want to use for my power data are as follows :
font:
  - file: "fonts/materialdesignicons-webfont.ttf"
    id: iconfont
    size: 30
    glyphs: [
      "\U000F1904", # home-lightning-bolt-outline
      "\U000F0E1B", # car
      "\U000F12A3", # full battery
      "\U000F0F9C", # house-import
      "\U000F0F9B", # house-export
      "\U000F0A72", # solar-power
      "\U000F151E", # ev-plug-type2
      "\U000F01AE", # currency-gbp
      "\U000F058C" # water drop
    ]
To get the values that define the glyphs, the material design link I had earlier in the post shows the values when you select an icon.
To use an icon within your lambda, you can then use the following form :
it.print(x_loc, y_loc, id(iconfont), "\U000F0E1B"); //car
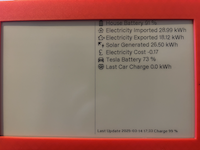
Bringing the data described in the last post gives us a functional display with real data.
![]()
Yay - the electricity company owes me 17p net for my usage vs solar export today.
